| Home | About | Download | Service | Deutsch |
| blueshell Active Tables | ||||
| blueshell ADO Survey Kit (BASK) | ||||
| blueshell Data Guy | ||||
| blueshell Error Guy | ||||
| Harry's Access Tools | ||||
| service@blueshell.com | ||||
|
|
|
|||||||||||||
|
Enjoy the magic of connectivity |
||
|
|
(V2.03.0004, 1.61 MB, 2009-06-26 ) |
The blueshell Data Guy is an ADO-based editor for virtually
all types of databases. This program supports Jet (Access and ISAMs like dBase,
Paradox etc.), Oracle, SQL server, MySql, Sybase and Advantage DB. Additionally you can use other OLEDB or
ODBC providers. All connections, schemas, table types and tables are shown using
a tree view. Enjoy the magic of connectivity using Cut & Paste or Drag
& Drop with applications like Word or Excel. The blueshell Data Guy Professional is a must-have for every DB pro. Edit Triggers and Stored Procedures, define RI and much more... Download the trial version now! |
 The
blueshell Data Guy is an ADO-based editor for virtually all types of databases.
This program supports Jet (Access and ISAMs like dBase, Paradox etc.), Oracle and
SQL server. Additionally you can use other OLEDB or ODBC providers.
The
blueshell Data Guy is an ADO-based editor for virtually all types of databases.
This program supports Jet (Access and ISAMs like dBase, Paradox etc.), Oracle and
SQL server. Additionally you can use other OLEDB or ODBC providers.
All connections, schemas, table types and tables are shown using a tree view. You can open a new connection and tables of this connection with a few mouse clicks. You can watch all properties of your opened connections and of the recordsets using bAsk - the "blueshell ADO Survey Kit" included in this program.
Enjoy the magic of connectivity! Exchange tables between your Desktop applications like Word, Excel, Outlook, Frontpage etc., your database files (.mdb, .dbf, .xls, .db etc.) and your client-server databases like Oracle, MS SQL Server etc. Nearly everything that can contain a table can be the source or the destination! Import, Export, Copy, Paste, Drag and Drop as you like!
The blueshell Data Guy uses the atb control from blueshell Active Tables. A runtime version of this great ActiveX control is included.
 blueshell
Data Guy (bDg) now has a Table Design window to modify the
Data Definition of your tables (modify / delete / add fields). A new useful feature
for Access developers is a function called Forward to Access.
To make your life easier the Guy now offers a Toolbar and provides a
Tips window to display useful tips.
blueshell
Data Guy (bDg) now has a Table Design window to modify the
Data Definition of your tables (modify / delete / add fields). A new useful feature
for Access developers is a function called Forward to Access.
To make your life easier the Guy now offers a Toolbar and provides a
Tips window to display useful tips.
Jet - and therefore bDg, too - observes the file Schema.ini when using Textfile database tables (*.txt, *.csv, *.asc, *.tab etc.). For these Text tables there is a new entry in the Table menu called "Schema.ini..." that leads you to the Schema.ini editor.
The Professional Version adds some other great features:
The Design window now contains a Foreign column. If you want to use a Foreign Key on your column, just pick a suitable foreign column. Defining Referential Integrity (RI) has never been so easy! Note that Referential Integrity (e.g. Foreign keys) are now automatically detected by blueshell Active Tables. This results in drop-down lists and navigation buttons for columns having foreign keys! (Does anyone know another product that manages this automatically?)
blueshell Data Guy Professional contains the new SQL Cook. It helps you to design valid SQL code.
The window Connections shows all open databases (connections) along with their tables using a tree view. It may be displayed in one of three modes and it may be switched off. You can use the menu View to switch between the modes.
Tip: You can drag the window Connections while it is in Docked mode to switch to another mode. Dragging outside the main window yields Free mode, dragging inside turns into Fenced mode. Double-clicking Connections' status bar (while in Free or Fenced mode) switches to Docked mode.
![]() Do you want to see some data? Use the Open command from the
File menu and select your database file (.mdb, .xls, .dbf etc.). The Data
Guy opens your file and inserts a new connection node (if needed) into the tree
view of the window Connections. Now you are ready to open a table from this
connection. If your database file holds a single table (like xBase files do) this
table is opened immediately otherwise see "Opening a table" below.
Do you want to see some data? Use the Open command from the
File menu and select your database file (.mdb, .xls, .dbf etc.). The Data
Guy opens your file and inserts a new connection node (if needed) into the tree
view of the window Connections. Now you are ready to open a table from this
connection. If your database file holds a single table (like xBase files do) this
table is opened immediately otherwise see "Opening a table" below.
Tip: With a right click of your mouse (or Window's Application Key
![]() ) on the Connections node you
will get the File menu as a context menu.
) on the Connections node you
will get the File menu as a context menu.
![]() Do you want to connect to a client/server database like MS SQL Server
or Oracle? Use the New → OLE DB Connection command from the File menu.
It opens a dialog box from which you can select the proper OLE DB provider. You
may enter your login name and even your password, if you like.
Do you want to connect to a client/server database like MS SQL Server
or Oracle? Use the New → OLE DB Connection command from the File menu.
It opens a dialog box from which you can select the proper OLE DB provider. You
may enter your login name and even your password, if you like.
Tip: You may store your connection parameters to a .conn file using the Save as command from the File menu. You may then use this file later with File Open.
![]() You want to create a new database (e.g. NewFile.mdb)? Choose
File → New → File Database and specify the type and the name of your database
file.
You want to create a new database (e.g. NewFile.mdb)? Choose
File → New → File Database and specify the type and the name of your database
file.
Expand the connection node by double-clicking on it or by clicking on the "+" sign. You can see the catalogs, schemata (where applicable), table types and tables in the connection tree. You can open a table with a double click on the table node, by using the Table menu or by using the context menu (with a right-click on the table node). If the table is already open, the Open function results in bringing the table's form to the foreground. When you open a table, you may edit (when not read-only) and view its contents.
When you want to open more than one instance of a table, then you can select the table and click on Open Copy.
If you are familiar with SQL then perhaps you want to use a SELECT command against your connection. Use the Open Command command from the Table menu to enter any SQL command. If it yields a recordset (like a SELECT command) it gives you a table like the Open command does. But you can also enter any other valid SQL command.
To rename a table, just click on its node at the Connections window and wait a second, then click again. If the node isn't a database table but a command or a table copy this doesn't rename a table; it only changes the caption of the table's form. Similarly you can rename a connection node. If you are using a .conn file, this caption may be saved for future sessions.
You can rename table nodes and connection nodes only, not the other nodes.
![]() With the bAsk ADO Viewer you can get information
about connections and about the recordset of open tables. Use the Properties
command from the File menu to see info about the connection or use the
Properties command from the Table menu to look at the details of a table.
With the bAsk ADO Viewer you can get information
about connections and about the recordset of open tables. Use the Properties
command from the File menu to see info about the connection or use the
Properties command from the Table menu to look at the details of a table.
The Tips window is displayed at the bottom of the main window, just above the
status bar. You may use View → Tips or ? → Next Tip to display the
Tips window. When you've enjoyed the tip, you may press the Close button
 at the right of the Tips window or even
the Next Tip button
at the right of the Tips window or even
the Next Tip button
 . You may resize the Tips window by dragging its
upper edge.
. You may resize the Tips window by dragging its
upper edge.
If you're switching off the Tips window through View → Tips, you're asked whether the display of the Tips window on startup should be suppressed, too.
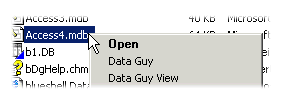
Performing a right-click on any database file at Windows Explorer you will get a context menu with at least the two entries Data Guy and Data Guy View. Using these entries you will open the database file in blueshell Data Guy for editing or in read-only mode respectively. In addition .mdb files will have an entry Data Guy Forward that forwards the file to the most appropriate Access application you have installed on your system. See Forwarding to Access for details.
blueshell Data Guy supports Drag and Drop operations. The basic idea is: Select some data at the first application, click it with the mouse (without releasing the mouse button), drag it using the mouse (still holding the mouse button) onto the second application and finally drop it onto that application (release the mouse button).
Drag one database file or more database files (.conn, .mdb, .dbf, ...) from Window's desktop, the Explorer or any other compatible program and drop the database file(s) onto the Connections window. The databases will be connected.
Drag a table or a part of a table from any compatible Windows program and drop it onto the Connections window. A new table will be added to the scribbling-block containing a copy of the cells you dragged from the other application. The scribbling-block is a special in-memory connection.
Tip: Use the Export command to copy the data from a scribbling-table to any other connection.
Drag a table node from the window Connections to any other compatible application like Word, Excel or Outlook.
You may use Copy and Paste from the Edit menu to exchange data with other applications using the clipboard. blueshell Data Guy uses "HTML Format" and "Text Format" as valid import formats (with the Paste command) and exports tables using "HTML Format", "Rich Text Format" and "Text Format". This allows interoperatibility with all famous applications like Word, Excel, Outlook, Frontpage and much more.
![]() Select a table from the tree view and select the Copy command.
Then change to the other application and select Paste from its Edit
menu. A copy of the table will be inserted into the other application.
Select a table from the tree view and select the Copy command.
Then change to the other application and select Paste from its Edit
menu. A copy of the table will be inserted into the other application.
![]() Select a table or a rectangular part of a table in a foreign application.
Select Copy from its Edit menu. Then change to blueshell Data Guy
and select Paste from the Edit menu. A copy of the table (or the
selected cells) will be added as a new table of the scribbling-block.
Select a table or a rectangular part of a table in a foreign application.
Select Copy from its Edit menu. Then change to blueshell Data Guy
and select Paste from the Edit menu. A copy of the table (or the
selected cells) will be added as a new table of the scribbling-block.
If you want to start the Data Guy from a command line, you can use the command line interface.
DataGuy [-option] filename [[-option]
  filename ...]
option
r -read-only
a - forward to Access
To use filenames with spaces in the command line, set the filename in quotation-marks ("file with spaces.dbf").
Example:
DataGuy -r nwind.mdb "file with spaces.dbf"
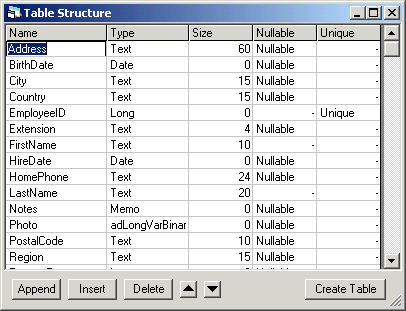
![]() Select the connection where you want to add the table to. Select New
from the Table menu. The Table Structure window appears. Define the
fields of the new table:
Select the connection where you want to add the table to. Select New
from the Table menu. The Table Structure window appears. Define the
fields of the new table:
Use the Append or Insert button to add a new line, use the Delete button to delete a line or use the up/down button to move a line. Finally press Create Table to make the new table.
Tip: You may also copy a structure from an existing table (even from another connection) as a template for the new table. Use Design from the Table menu on the template table, apply your modifications to the list and finally press Create Table. Not enough? You may also export data from any table into a new table using the Export feature.
![]() You may modify the structure of your table using Design from the
Table menu. This opens a Design window showing the table's fields along with
their properties. You may edit the information an then press Alter Table.
You may modify the structure of your table using Design from the
Table menu. This opens a Design window showing the table's fields along with
their properties. You may edit the information an then press Alter Table.
Depending on the provider this function is often restricted. The "official" ADO/ADOX ways to modify data definition are unfortunately only poorly supported by the various OLE DB providers. We're trying to do our best to use SQL in order to manage the modifications, but the SQL syntax on most databases often doesn't match standards like SQL92. If a special function doesn't work for your database, maybe you'll be able to enter an appropriate command manually using Open Command from the Table menu. If you've discovered such a workaround, please write us at service@blueshell.com and we will integrate it in future releases.
You may rename or delete tables using Rename Table or Delete Table from the Table menu. See also Renaming a node for a smart way to rename a table.
![]() Using blueshell Data Guy you may export from any connection to
any other connection. Note that bDg's connection concept includes the scribbling-block.
Using blueshell Data Guy you may export from any connection to
any other connection. Note that bDg's connection concept includes the scribbling-block.
If you're an Access developer who works with more than one version of Microsoft Access you have to be aware of an Access peculiarity: Each version of Access has its own .mdb format, if you want to modify things like forms or queries you've to use the right version of Access. blueshell Data Guy helps you to detect the Access version of a .mdb file and allows you to forward it to the most appropriate Access application. blueshell Data Guy detects automatically which versions of Access are installed on your system: If you're forwarding an Access 98 file but you don't have Access 98 installed this file will be forwarded to the next installed version (e.g. Access 2002).
You may use the command Forward to Access from the File menu, the Explorer interface or the Command line interface to forward a .mdb file to Access.
Jet (including Access) database files (*.mdb) should be compacted from time to time. Using the Backup/Compact command of blueshell Data Guy you can easily make a backup and compact a Jet database in one step. Just open your Jet database file and use the Backup/Compact command from the Files menu.
The original database file is backed up read-only with a numeric extension in the same folder. If your file is Sample.mdb, the first backup will be Sample;1.mdb, the second backup will be Sample;2.mdb etc.
The professional features are available with blueshell Data Guy Professional. You need a professional license in order to use it. During the trial period you may use the professional features without limitation. With a standard license the professional features aren't available. However, you may still run a limited test on the professional features with a standard license.
It's easy to upgrade to a professional license. Please select ? → About and you will find a link to further information.
Select View → Professional to set your Data Guy to professional mode. The Connection window will now show an extended tree with database objects like triggers, stored procedures and sequences. Which additional objects are displayed depends on your database.
In professional mode the Table menu turns into an Object menu with an additional entry New Object. This enables you to create new objects of the additional types mentioned above.
When using professional mode the SQL Cook is ready to assist you in designing SQL statements. When you're using the Open Command/SQL window or the object designer there is a menu SQL Cook:
- Insert Command
- Inserts a whole SQL Command observing the syntax rules of your database system
- Insert Expression
- Inserts a SQL expression
- Insert Field
- Inserts a database field. When calling this function first, the Select Tables dialog (see below) is launched. Select the tables you want to use in your statement. Insert Field lets you choose from all columns of these tables.
- Insert Field list
- Inserts a whole list of fields as used in Select statements etc.
- Insert Function
- Inserts a SQL function
- Insert other SQL item
- Lets you pick a SQL syntax element from a list
- Select Tables
- Shows the Select Tables dialog. Choose a table from the Connections window and either double click it or choose Select from its context menu (available with a right click at the table's node).
When the cook is working, the window is split into two pieces. In the upper half of the dialog, SQL Cook is cooking your SQL statement. In the lower half, you can supply the cook with the appropriate ingredients, i.e. enter the requested information. Press "Next>>" to confirm these entries. Note, that you may edit the upper half by hand at any time! You may even enter some info into the lower-half controls and replace some other elements in the upper half by hand and then press "Next>>". Another option is to leave some controls untouched, to press "Next>>" and to enter the info later. Note, that you may drag the gap between the two window splits in order to resize them.
You may even extend the file Sql.ini in the blueshell Data Guy directory, but be careful - future setups may overwrite this file!
Make sure that your blueshell Data Guy is in professional mode. Select e.g. Object → New Object → View and the object designer will appear. You may press the Next>> button and the SQL Cook will ask you the information requested. If you are familiar with SQL you may also enter your SQL code directly. When you pressed Next>> and the SQL Cook detects that you've finished your entries the button Execute Create will be available. Press it to create your object.
If your SQL code worked you'll see your new object entered into Connections window's tree view. The object designer will still show your SQL code having its Execute button turned into Execute Alter. You may edit your code and press Execute Alter to modify your object.
There are some functions in the object designer:
- Open...
- Opens an SQL statement from a file
- Execute Create/Alter
- Executes the SQL statement in Create or Alter variant in order to create or alter the object
- Save
- Saves the SQL statement to a file
- Save as...
- Saves the SQL statement to a file selecting a destination
- Variant
- Selects one of the variants available for the SQL statements
- Auto
- Selecting the variant automatically
- Alter
- Alter an existing object
- Create
- Create a new object
- Open Structure...
- (Available with Views) Opens the table designer in order to view column definition and to create tables with a similar structure
- Close
- Closes the designer
Make sure that your blueshell Data Guy is in professional mode. Select an object from the Connections window. Select Object → Design... in order to open the object designer. Edit the SQL code of the object and press Execute Alter to write the changes to your database. See above for details on the Design menu.
Select the connection where you want to add the table to. Select New from the Table menu. The Table Structure window appears. Define the fields of the new table: