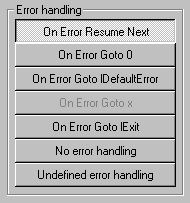


You invoke an error handler with the On
Error statement, which comes in several varieties. Using the
buttons on the screen shown here, you may choose the type of
error handling that you need:
Instead of pressing a button you can use a
corresponding keyboard action to check any On Error
statement. The underlined symbols help you to do it. So you can
press the underlined key only or a combination of
[Alt+underlined key].

- On error Resume
next. This statement informs Visual Basic
that you want to resume at the statement immediately
after the statement that generated the error, without any
visible intervention from VB. Press R or Alt+R to
implement this behaviour.
- On error GoTo 0.
This statement disables any internal error handling of
the routine. Visual Basic again traps subsequent
errors. This statement also resets the value of the Error
object, so if you need the values it contains, you
must store away its properties. You can press 0.
- On error GoTo lDefaultError.
This statement is used to cause Visual Basic to
jump to the default error handler if an error occurs.
This error handler is automatically inserted be the Error
Guy (and it will be removed if you change the error
handling). The Error handler simply calls the sub
"DefaultError" that you may define according to
your specific needs. A simple implementation could be as
shown below:
Function
            DefaultError(strName) As VbMsgBoxResult
DefaultError =
                MsgBox(Err.Description, vbAbortRetryIgnore +
                vbCritical + vbMsgBoxHelpButton, strName,
                Err.HelpFile, Err.HelpContext)
End
            Function
|
This implementation shows a message box
with the description of the error. You may press
"Abort", "Retry" or "Ignore" at
this message box. "Abort" will end the routine,
where the error occurred, "Retry" will try the last
statement (that caused the error) again and
"Ignore" will simply skip that statement.
You may press D or Alt+D to implement
this error handling.
- On error GoTo x. This
statement allows you to build up your own error handling
procedure. This may differ from the standard error
handling procedure that error handling wizard inserts.
The wizard is not able to insert, delete or alter these
error-handling codes.
- On Error GoTo lExit. Using this option, the Error Guy will insert a
label "lExit" at the end of your routine. If an
error occurs, the code proceeds at that label. You may
insert special clean-up instructions into your code after
the "lExit" label. You can press E or Alt+E.
- No error
handling. There is no error handling in the
routine because YOU decided, that it should be as it is.
O.K., we told you before, that it is good programming
practice to include an error handling into every routine.
But there is no rule without an exception. If you want to
access Visual Basic's Err object, you shouldn't have any
"On Error..." statement before, because all
this statements (even "On Error GoTo 0") are
clearing the Err object. Therefore we give you this
option to tell the Error Guy, that you don't want this
routine to contain an error handling. Press O or Alt+O to
change to this case.
- Undefined
error handling. This option tells, that you have
got no error handle in this procedure and (in opposite to
the former option) you didn't make the explicit decision
to include none. You may press U or Alt+U to get this
option.
If you change the type of error handle in
the selected procedure blueshell Error Guy informs
you about it and asks you for confirmation. An exception: If your
routine has "Undefined error handling" no confirmation
is necessary.
The current procedure of your application,
in which you include an error handler, is presented in the textbox
of the Error Guy form. That's how you can see the error
handling code that you have inserted.
You can look through your entire project to
be sure that all error handling is well defined. For this purpose
you can use the Find function with all its options. You may read
it on the next page.


